How to deploy an AdonisJs application to DigitalOcean
The AdonisJs framework, highly focused on speed and stability, was created as an alternative to other frameworks in the Node.js ecosystem.
With the power of an integrated system, developer ergonomics is provided on the truth that goal is far more achieved rather than coupling libraries.
DigitalOcean is a cloud infrastructure provider offering an on-demand cloud platform where your applications can be hosted and managed.In this tutorial, we will go through the steps of setting up your server and configuring your database on DigitalOcean. I also created a demo application in AdonisJs which we will deploy to DigitalOcean.
Other options are available for DigitalOcean. Feel free to check or use any of them. For the sake of upcoming developers, we will be using this tech stack.
Prerequisites
Before we proceed with this tutorial, you must have the following;
Basic understanding of Node.js (AdonisJs in particular) Basic knowledge of Git npm or Yarn installed. A DigitalOcean account
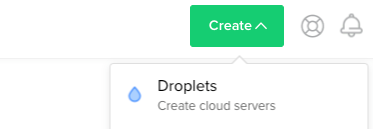
Create a droplet
Droplets are servers. When you log in to your DigitalOcean account, you will have to create a server first. Click the Create button at the top of the screen, which we will then create a Droplet.
Choose an image from the distributions. There are multiple options under the distribution lists. So, we will go with Ubuntu 20.04 (LTS) because it is common.
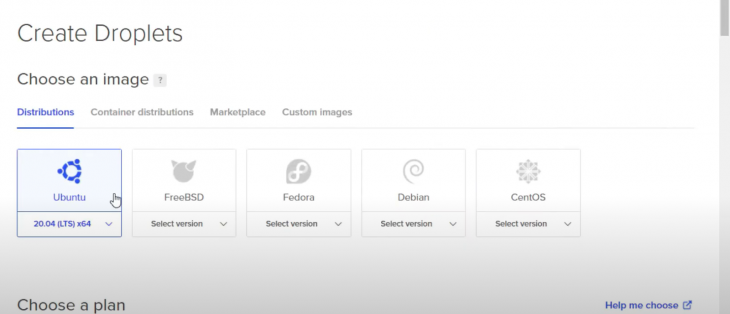
Then, we choose a plan. I advise that we choose the smallest plan since we will be deploying a pretty basic application. You can always scale up later if need be. Keep in mind that scaling down memory in the future is not possible.

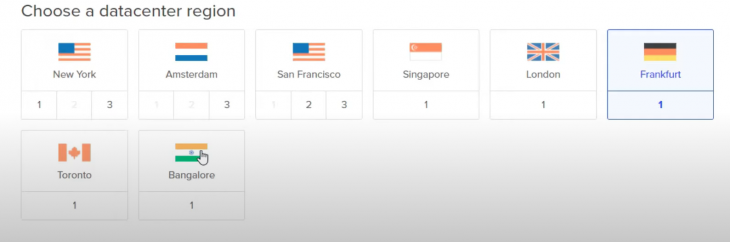
Choose a datacenter region. Pick the one close to you or where you think users will mostly live.
Next, we will need to add our SSH Key to our droplet. This is a very important part and there is room for confusion. SSH allows us to make a direct connection to the remote server(DigitalOcean) from our computer.
If you already have your SSH key added to DigitalOcean, you can select this:
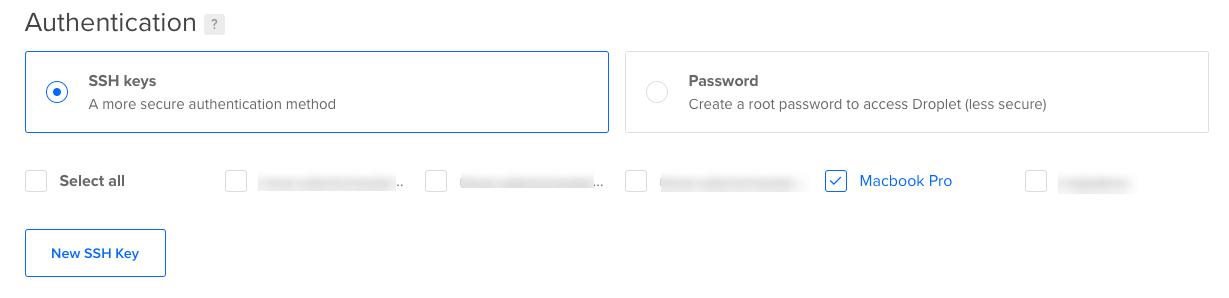
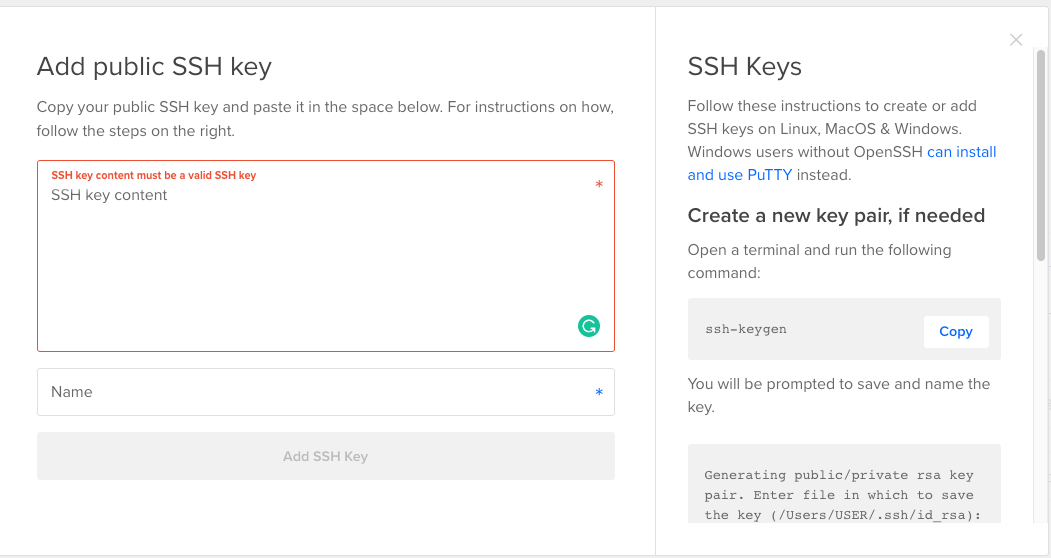
If you don’t have it added, then you will have to generate one. Copy and paste your SSH Key and give it a name. You can use Github’s guide to generate one and copy it to our droplet.
Finalize it by changing your hostname so it doesn’t generate a random name for you, and click Create Droplet.
Configure the server
Next, we will add SSH to our server to proceed. But we will need administrative privileges, so let’s create a new user and grant privileges.
Log in as root with our server’s IP address:
$ ssh root@105.112.72.138Add user now and note the password you used:
$ adduser dominicNow, let’s add this user to the sudo group so it can run root commands with the keyword sudo.
So, run this:
$ usermod -aG sudo dominicNow that we have added dominic to the sudo group with administrative privileges, we will also want to add the SSH Key to the user so that we can log in to the server.
$ su - dominicNext, create a directory called .ssh, create a file authorized_keys where our SSH key will be stored, and change the permission of the directory so its access is hidden.
$ mkdir ~/.ssh touch .ssh/authorized_keys chmod 700 .sshWe will also need to change the permission of the file so it can be read by all and only changed by the user domininc.
Now the most important step next is to paste our copied SSH key into this file. If you don’t have it copied, go back to your computer and copy it.
Open the file and paste the content into the file. Save the file, click esc to stop editing, :wq to write(save) and press ENTER.
Restrict the file now and exit:
$ chmod 600 ~/.ssh/authorized_keys exitLet us SSH back to our server, but with our newly created user. If it works, then we are set for the next step.
ssh dominic@105.112.72.138Install and setup MYSQL
Looking at our demo application, we used MYSQL for its database, so we will need to install and configure it in our server.
sudo apt install mysql-server sudo mysqlserverinstallation Next, we will need to log in to the MYSQL server and create a new user and database.
mysql -u root -pReplace USERNAME, localhost and PASSWORD.
CREATE USER 'USERNAME'@'localhost' IDENTIFIED BY 'PASSWORD';Run the next commands to allow us to use a password when connecting MySQL.
ALTER USER 'USERNAME'@'LOCALHOST'IDENTIFIED WITH mysql_native_password BY 'PASSWORD';We then create a database with the associated user:
CREATE DATABASE adonis_userAuth;Then, we grant all privileges, flush to make it work, and exit:
GRANT ALL ON adonis_userAuth.* TO 'USERNAME'@'localhost'; FLUSH PRIVILEGES; exitClone our application in our server Our final task is to clone our AdonisJs application from Github into our server using git. So, let’s SSH into our server again and clone our repo. You can always use SSL to clone it.
$ git clone https://github.com/Vectormike/adonis_blogApiGo to the cloned directory and install dependencies:
$ cd adonis_blogApi npm installWe still have our environment variables to fix in a file. AdonisJs reads all variables through an .env file. These variables are our configuration settings.
We create that file .env so it can contain our variables for the AdonisJs application.
$ touch .envWhen created, we then generate our application key APP_KEY. Without this, our application won’t run.
$ adonis key:generateThis generates some random numbers. Copy the key and open the .env file so we can paste all our variables, including application key.
$ vim .envThen, paste the following variables:
HOST=127.0.0.1
PORT=3333
NODE_ENV=production
APP_NAME=AdonisJs
APP_URL=http://${HOST}:${PORT}
CACHE_VIEWS=false
APP_KEY=mAqOZJTaXhbcvxPGVckSyUI1UeCeYIUM
DB_CONNECTION=mysql
DB_HOST=127.0.0.1
DB_PORT=3306
DB_USER=root
DB_PASSWORD=
DB_DATABASE=adonis_userAuth
HASH_DRIVER=bcrypt
We need to run migration for our tables to be created. If your environment is on production, you might need to add the --force flag, or else it won’t create the tables.
$ node ace migration:run --forceLastly, we start our application to run. But what if it crashes? That’s why we have to us PM2 so it restarts automatically when it crashes.
Run this command if NODE_ENV is production:
$ pm2 start server.jsConfigure Nginx
We will need to use Nginx to setup reverse proxy. This will allow us to reach our application externally rather than being able to visit via our local server network. This way we can access it through an IP address or domain name rather than just the PORT.
So, we open the Nginx configuration file and edit:
$ sudo vim /etc/nginx/sites-available/defaultPaste the configuration below. This will tell Nginx to listen to an incoming domain related and forward all requests to the PORT in your local server network.
$ server_name DOMAIN_NAME_OR_IP_ADDRESS;location / {
proxy_pass http://localhost:3333;
proxy_http_version 1.1;
proxy_set_header Connection "upgrade";
proxy_set_header Host $host;
proxy_set_header Upgrade $http_upgrade;
proxy_set_header X-Real-IP $remote_addr;
proxy_set_header X-Forwarded-For $proxy_add_x_forwarded_for;
}Replace server_name with your IP address or domain name (if set). For our changes to work, we have to restart Nginx.
$ sudo service nginx restartOur application will now be accessible by hitting the IP of our server.
Conclusion
In this tutorial, we learned how to deploy an AdonisJs application to DigitalOcean. We also learned how to configure Nginx so as to set up reverse proxy, configure our droplet, and set up our database on DigitalOcean.
This article should have explained each step needed to deploy our application.
We could add an auto-deployment script to our process. This will pull recent code from our repository, install dependencies, run migration, and restart the application.
To learn more about DigitalOcean, head over to DigitalOcean for more tutorials.
The source code used as a demo for this tutorial is on Github . Feel free to clone it.